Showing posts with label enchanted polish. Show all posts

Friday, March 25, 2016

Fair maiden Hyper and Mischievous and floral water marble decal

Introduction

Good day darlings. I continue to use my Fair maiden Rainbow brights for water marble. This time I combined blue and green colors for floral design on middle and ring finger. These flowers turned out really pretty, but I had to cut them to fit my nails. On index and pinky i did simple french which was super easy, I applied one stroke of green Mischievous on top of semi-dry blue Hyper, let it dry and topped with Rainbow juice Enchanted polish.

Results
Figure 1. "Blue and green flowers"

Saturday, March 5, 2016

40 great nail art ideas: Pastel neon gradient with animal print stamping "Sping zepard"

Introduction

Good day darlings. This week we were doing pastel designs for 40 great nail art ideas challenge and my prompt was "Leopard print". Recently I saw gorgeous many created by Clairestelle8 where she is turning neon polish into pastels and that's exactly what I did here. Basically, you have to add layer of white polish on your sponge after you applied neons (short video tutorial will be on my IG). Also i was inspired my animal print image from MoYou London Explorer 23 which combines both leopard and zebra print. So I decided to recreate it, but with different plates because I wanted more delicate image on my small nails. Given that I had to make it on my Cinderella right hand (two nails are broken on my left hand..) clear stamper from Born pretty store turned out to be very handy. I'm not a huge fan of animal print, but this mani turned out fantastic. Too bad on my pictures you can not see very well delicate holo sparkle from Djinn, but it looks marvelous in real life. Oh yeah, I call this mani "Spring zepard", let me know what do you think about it.

Results


Figure 1. "Sping zepard"

Sunday, January 3, 2016

Nail art with colorful foil stamping fireworks "Happy 2016"

Introduction

Good day darlings. I could not resist and made another firework stamping to celebrate new year. I was inspired by awesome blogger Zlata and used multicolor foil with added round glitter on top to write 2016. Unfortunately after glitter placement, fireworks became less bright, luckily I took some pictures before. If you are interested how I do foils stamping take a look at my video tutorial. So many people ask me about it and what are the trick which I use, that I decided to make a Foil stamping troubleshooting tutorial, with pictures and real time videos. It's gonna take me some time to put all info together, but I hope to post it this month. 

Results


Figure 1. Nail art "Happy 2016".

Wednesday, December 30, 2015

"New year's fireworks" with holographic foil stamping

Introduction

Good day darlings. New year is just around the corner, so I could not resist and made firework nail design using holo foil stamping. In the shade it looks just like gold stamping, but in the sun you can actually see those hypnotic folo beams and they become real fireworks. I used wonderful Pet'la plate for this design (fireworks), turns out it has perfect etching for foil stamping. My stamping polish was Konad Black pearl and top coat Revolution by Picture polish. Oh and background is fantastic dark teal August 2014 from Enchanted polish, although you can not see all its beauty covered by fireworks. Also I made another video tutorial for you. Happy new year !!!

Results


Figure 1. Nail art "New year's fireworks"

Tuesday, December 8, 2015

Red gradient and golden Christmas ornaments nail art with metallic tattoos

Introduction

Good day darlings. Once again I decided to combine two challenges When colors collideRed and gold prompt and Ornaments for 12 days of Christmas nail art challenge. I started with red gradient including dark red cream Valentine (next to the cuticle), red cream Shock (middle) and red jelly with gold shimmer Vegas (on the tips). This gradient turned out very beautiful and so reach. I tried my best to show it on pictures, but it was even better in real life. To make golden ornaments which would really pop up, I used gold tattoos. It's my second time using tattoos for nail art and I'm absolutely in love with the final result. So bright and festive, I could wear these for entire Holiday season and never get bored.

Results


Figure 1. Nail art "Christmas ornaments".

Monday, November 23, 2015

When colours collide: Zodiac nail art with vertical gradient using Enchanted polish

Introduction
Good day darlings. Today I want to share my zodiac mani for collaboration project "When colours collide". I did not have any zodiac stamping plates, so I had to do a free hand... To compensate for simple zodiac signs drawing I attempted vertical gradient with lots of holo polishes, well it does not really look like a gradient, boo.... The zodiacs on each finger correspond to my family members. Leo is my mom and me, Taurus - my dad and sister, Pisces my hubby and Virgo is for my baby boy :) Firstly, I created gradient on each nail and topped them with 7 nations army holo glitter. Next, I made decals of each zodiac sign and applied them and finally I added my favorite holo topper Djinn in the bottle. Voila, lots of holo sparkle and so colourful. In addition, I used same polish to create mandala design on my thumb for macro challenge.

Results
Figure 1. Nail art "Family zodiac".

Monday, November 16, 2015

Enchanted polish Afternoon delight and stamping nail art "Coffee delight"

Introduction

Good day darlings, while I was on vacation my huge 33 plates Mo You London order arrived and today I'm gonna show you nail art with one of these plates. Cook Book 04 plate is all about coffee, perfect for macro challenge "Hot beverage" prompt.  In addition, I used triangle vinyls from Emily de molly to make and entry for Clairestelle8 challenge. Base color is an amazing nude holographic Enchanted polish - Afternoon delight and stamping was done using DRK nails Metallic brown. Stamping was easy, but application of vinyls was a bit tricky. These Triangles vinyls are pretty thin and had a tendency to tear if I was not careful enough. On the bright side, I was really happy with polish combination, it looks stunning and makes a wonderful coffee themed pallet. 

Results


Figure 1. Nail art "Coffee delight".

Sunday, July 12, 2015

Double gradient nail art with square spiral vinyls from Emily de molly "Beyond colorful"

Introduction

Hello my dear readers today I have a double post for you with both left and right hands done using exactly the same polish, but different nails art techniques. No stamping though ;) I used cream/holo polish combo from my double color blocking post. For the left hand I did first layer of gradient using 4 different creams, applied square spiral vinyls from Emily de Molly and added second holo gradient with four matching polishes. These nails look wonderful and much more light, than with color blocking, exactly as I expected. And it's my entry for colorful #OMD3 prompt and vinyls prompt at 30 Days of Colour. On the right hand I did skittles nails with cream background and holo top, V shapes were done using stripping tape. Oh, and thumb had double gradient round spiral, just for fun. This was my entry for V-shape #OMD3 challenge. There is something magic about this colorful cream/holo combo, I simple love using it.

Results 


Figure 1. Nail art "Beyond colorful"

Friday, June 19, 2015

30 Days of Colour: Neon gradient with double stamping and Enchanted polish 7 nations army "Geometric escape" or "Dragon fruit"

Introduction

I did not have any new textured polish for textured/geometric prompt in June 30 Days of Colour, so I went with geometric. The background for white triangle stamping is a bit complex. I started with neon gradient, and added some floral stamping. This looked super pretty and I'll publish it as a separate mani next week (you can find it here). however it did not look complete, so I used it as a base for this challenge and added some triangles from BM 414 plate.  Still could not stop and added gorgeous glitter with holo effect 7 nations army as a topper, only after that I was fully satisfied.

Results


Figure 1. Nail art "Geometric escape" or "Dragon fruit"

Monday, June 1, 2015

June macro challenge: Enchanted polish Kids swatch.

Introduction

New month - new challenge - June macro challenge!!! Enchanted polish Kids is one of my favorite enchanteds and I swatched in April before doing Mermaid nails. Since our macro challenges starts with Holo, I decided that it will be a perfect beginning for  summer. it's holo and duochrome, maybe even multichrome, so below you will see many pictures where I try to capture different looks of this wonderful polish. take a look at last picture with polish brush, it's a gorgeous macro showing holo sparkle very well.

Results


Figure 1. Enchanted polish Kids swatch.

Sunday, May 24, 2015

30 Days of Colour: Color blocking with vinyls, pastel creams and holos "Holo undies"

Introduction

Two days later, but I want to post my cream/color blocking mani for 30 Days of Color challenge. I had an idea to make double color blocking and use some vinyls, which I bought at Emily de Molly website, it was way to ambitious for my level of this technique. The polish combo of paste creams and holos works together marvelous, but whole mani would look much better with gradient technique, rather than blocking. Needless to say it took ages to dry and looks very thick. I could not decide which bottle to hold, so I made a group bottle pictures instead :) My favorite is spiral on the thumb, that's why I plan to repeat this mani using gradients and spirals.

Results


Figure 1. Nail art "Holo undies".

Tuesday, May 19, 2015

HPB presents: Nail art and tutorial with radial gradient and stamping "Tea roses"

Introduction

Today I'm posting my third nail design with May flowers for HPB and it also counts as stamping entry for 30 day of Colour challenge. This look was inspired by tea-roses which I had for Mother's day and it's my first attempt at radial gradient. I really enjoyed creating this gradient and stamping as it has my favorite colors all together. Even though final look turned out more orange than actual roses, I love it and would not change anything. It was also first time when I used cuticle protector called Crystalline nail veil, which I bought from Color4nails. I was every impressed with this product, it was easy to apply and clean up after gradient and stamping was super easy. It inspired me to create small tutorial on this look (figure 6)., let me know if you are going to try and recreate it.

Results


Figure 1. Nail art "Tea roses".

Monday, May 18, 2015

HPB Presents: Double stamping topped with Enchanted polish Djinn in the bottle "Sunny afternoon flowers"

Introduction

This nail art with double stamping was done in three stages and I posted two of them before: reciprocal gradient with Pia and Pinking out of the window and wood-like stamping with metallic brown. Final stage was to stamp white flowers and coat it all with holographic topper Djinn in the bottle. I loved look at every stage, but was fully satisfied only after application of Djinn. Every layer works so good with the previous one and at the beginning I had no idea what would be the final look. It was improvisation at every stage and result is just wonderful. Did you ever started mani without clear idea how you will finish it?

Results


Figure 1. Nail art "Sunny afternoon flowers".

Sunday, May 17, 2015

HPB Presents: Enchanted polish 2 AM summer night and stamping nail art "Night garden"

Introduction

This month is dedicated to May flowers in Hobby polish bloggers FB group (HPB). It just happened that I accumulated several beautiful floral manicures and I decided to share some of them during HPB floral week (May 15-22). This is my first entry, simple stamping which looks really good, because background polish 2 AM summer night (swatched here) is so reach and vampy. I used QA plate which was my long term obsession and was pleased with results.

Results


Figure 1. Nail art "Night garden".

Thursday, May 14, 2015

Tribal stamping nail art with Enchanted polish Freeze machine "Triangle gradient"

Introduction

I hope you are not tired of thermal polish, because today I have stamping combined with glitter gradient and thermal polish. If you follow my blog you might recognize two previous swatches as a base for this tribal stamping (Termo trio 1 and Freeze machine). I simply love this final version with stamping, all elements just works perfectly together and due to the thermal sensitivity you have several different looks in one mani.  My favorite is medium cold version with purple background and dark blue tips. I can say that my love for thermal polish gets dipper every time I use one.

Results


Figure 1. Nail art "Triangle gradient"

Monday, April 27, 2015

30 Days of Colour: Emily de Molly Abstract canvas swatch

Introduction

Day 27 of Colour challenge is untried, hmmm most of the polishes I showed were untrieds. So for today, I chose Emily de Molly glitter, which I loved in the bottle, and on swatches, but never knew which kind of base color to use - Abstract canvas. In the beginning of this challenge after swatching Good life, I decided to add Abstract canvas on top and this accidental combo looked super nice.  Black and gold with a bit of color. Next time I have to use Abstract canvas for nail art, it's a beautiful glitter.

Results

Figure 1. Collage with Abstract canvas.

Thursday, April 23, 2015

30 Days of Colour: Enchanted polish Freeze machine swatch

Introduction

The newest polish in my collection was Freeze machine, gorgeous glitter created by Enchanted polish, which I was able to get at last NPC restock. I decided to combine it with Termo trio polish by Dance legend and to emphasize thermal gradient I applied more glitter at the tips of my nails. It looks like this combination is a perfect match to show sparkling beauty of Freeze machine. It looks especially stunning in normal conditions, when nail tips are turning into darker purple-blue color instead of pale blue. Below you can see plenty of pictures, because I wanted to show how it looks at different temperatures.

Results

Figure 1. Collage with  Freeze machine.

Sunday, April 19, 2015

30 Days of Colour: Enchanted polish 2 AM summer night swatch

Introduction

I'm really excited about today's Vampy post. I chose another Enchanted polish 2 AM summer night and I love how it turned out. Me and this pretty had difficult relationships, when I first purchased 2 AM, I did not like it at all and sold it. If you know how hard it is to get Enchanted polish from silent restock, you'll agree that my chances of getting another bottle were very low. Luckily, I was able to get it second time, and only after that I realized its beauty and charm. Yet it stayed in bottle, waiting patiently for 7 months, until last week when I swatched it for this challenge and fell in love with my precious 2 AM.

Results


Figure 1. Collage with 2 AM summer night.

Thursday, April 16, 2015

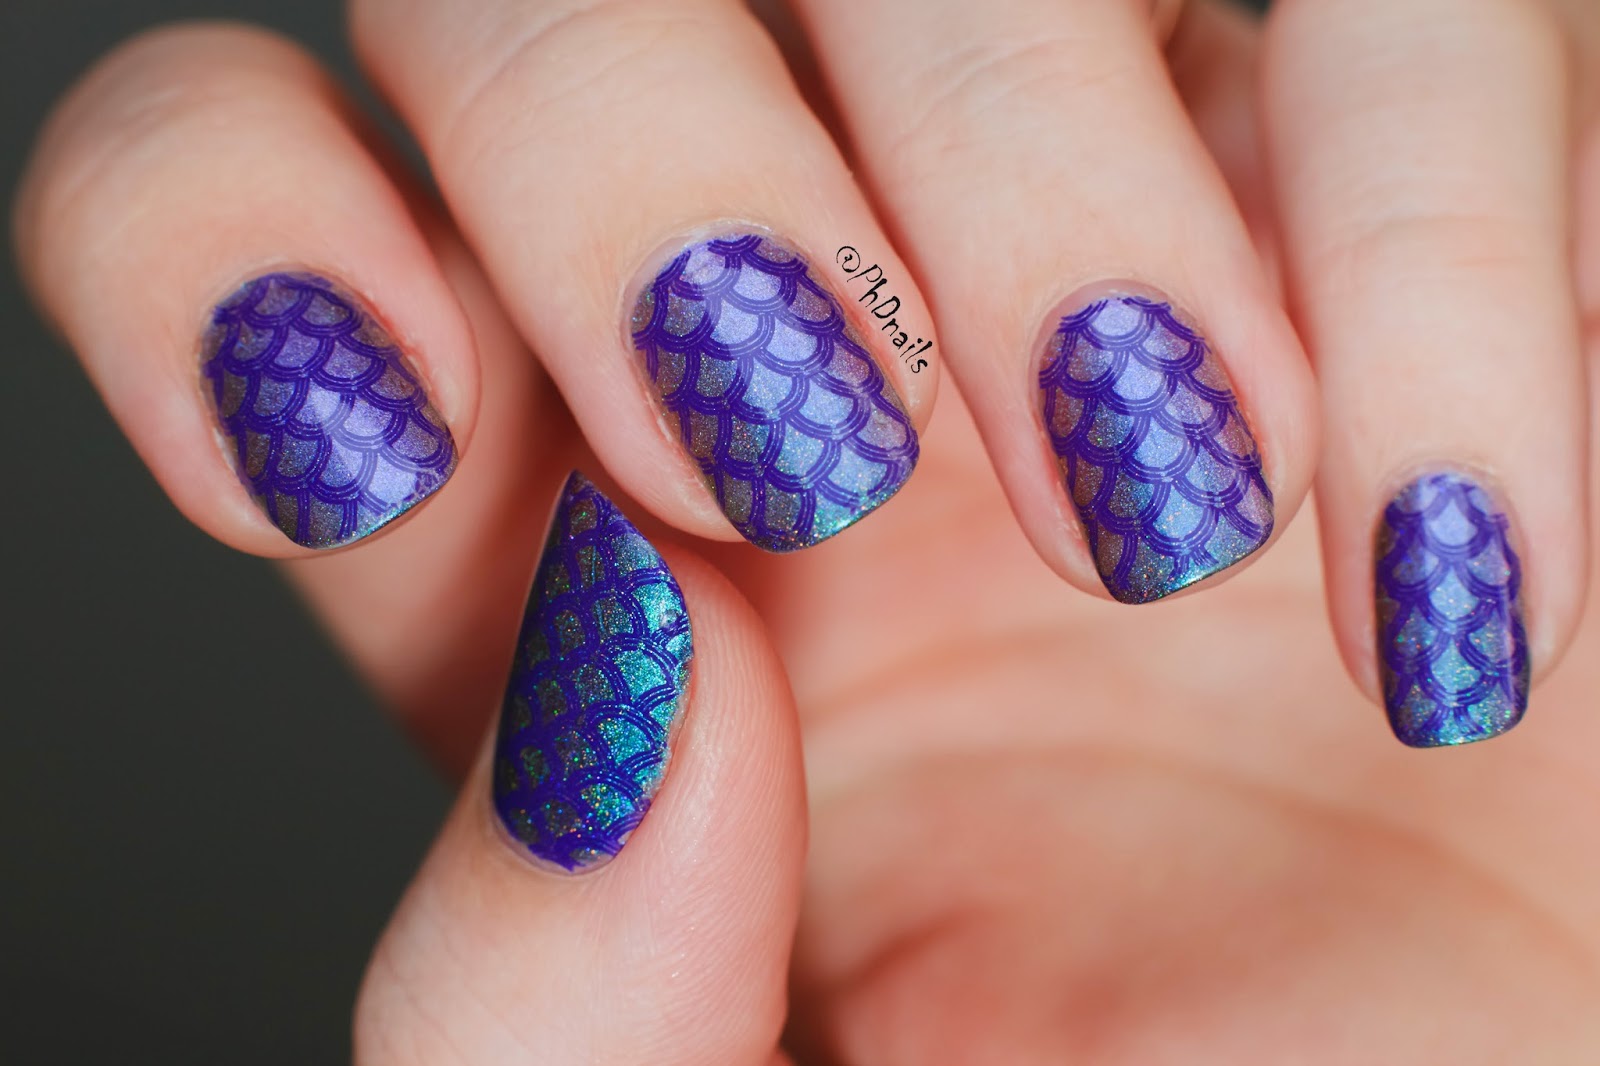
30 Days of Colour: Enchanted polish Kids Mermaid nails

Introduction

It's Thursday and I want to combine two challenges in one post. For ABC challenge we are supposed to do V/W polish and use holographic polish for 30 Days of Colour challenge. That's why I did stamping with Mundo de Unas Violet on top of holographic Kids by Enchanted polish. I chose scale image for stamping and I think this combination looks stunning. With all gorgeous color shifts and holo sparkle it makes perfect Mermaid nails. Even though this look was easy to make it looks outstanding and I'm absolutely loving it.

Results


Figure 1. Collage with "Mermaid nails".

Wednesday, April 15, 2015

30 Days of Colour: Enchanted polish Flashing lights swatch

Introduction

Day 15 of Colour challenge is glitter day and I want to share holographic glitter bomb packed with golden microglitters - Flashing lights by Enchanted polish. The concentration of glitter is so high, you can easily wear it without any base coat polish. And of course this polish has outstanding holographic shine, which can melt almost anyone's heart. I'm sure flashing lights would look great on top of colorful background or as a glitter gradient and this is something I definitely wanna try. In fact, I like this polish so much, I even made some pictures with flowers, hopefully you will enjoy this floral photo session :)

Results

Figure 1. Collage with Flashing lights.