Showing posts with label yellow. Show all posts

Saturday, April 9, 2016

40 great nail art ideas: Zoya Darcy swatch with Tom & Jerry nail design

Introduction

Good day darlings. I had a one week break from anything nail-related, but now I'm back. And I have a sunny yellow cream to show you - Darcy by ZOYA. I'm super happy with this yellow, both color and application are fantastic. It was opaque already after two coats, but I did use nude colored base. The second part of this post is nail design inspired by kids TV, which I did for 40 great nail art ideas challenge. It was a perfect opportunity to use Tom & Jerry water decals form Born pretty store and try cheesy nail. On figure 1 you can see shiny version, while on figure 2 decals are mattified, not a big difference though. I love how bright and cheerful it looks, definitely brings some of my childhood memories  back. What is your favorite T&J episode? Mine is with frozen kitchen - Mice follies.

Results

Figure 1. Tom & Jerry nail design and Zoya Darcy.

Wednesday, March 23, 2016

Colors by llarowe Silence swatch

Introduction

Good day darlings. Today I wanna share these sunny swatches of wonderful flakie polish called Silence. I took these pictures long long time ago and forgot about them until I saw sunshine prompt at 30 days of colour challenge. The combination of thermal Gossamer dust and Silence does look like a sunshine on your nails is not it? Check out macro at the end of my post to see how flakies change their color from yellow-green to pinkish gold dependent on the angle.

Results
Figure 1.  Silence swatch.

Sunday, February 14, 2016

Valentine's gradient stamping nail art "Kiss me" with BPL 021

Introduction

Contains press sample

Good day darlings. I hope you had a wonderful Valentine's day. Here is my last (or maybe not) love inspired design called "Kiss me". I used gradient stamping over black polish and it turned out really pretty. This couple image from BPL-021 was quite popular for Valentines manicures and I decided to make not only a video tutorial, but also a short cartoon. Both videos will be posted on my IG, check them out <3

Results

Figure 1. "Kiss me"

Wednesday, February 10, 2016

Picture polish Autumn swatch and gradient stamping nail art "Orange dahlia"

Introduction

Good day darlings. Today I'm gonna show you all my favorite colors in one mani. Orange background is a wonderful Autumn from Picture polish. It has bright cheerful orange color and scattered holographic particles. Since this polish is a jelly you might need 3 coats for a full coverage, I used 2 coats and on some picture you can see free edge line. Nevertheless, I love this shade of orange. My two other favorite colors are yellow and green, so I combined them in a gradient floral stamping. Amazingly very pale yellow and neon green mixed together nicely and matched Autumn perfectly. Design looks bright and fresh and if you like it, check out video tutorial on my Instagram

Results


Figure 1. "Orange dahlia".

Saturday, January 30, 2016

HPB presents: Gradient stamping "Yellow daisies"

Introduction

Good day darlings. This is my entry for January HPB link up with theme - gradient. I decided to do a gradient stamping. Background for this stamping is shattered glass inspired by Sveta Sanders using dried flakie polish cut into pieces. It turned out quite nice, but only after second attempt. For gradient stamping I choose floral images and two yellow polishes. Gradient turned out subtle, but I love how flowers show up on background and how flakies sparkle giving it a 3D look.

Results

Figure 1.  Nail art "Yellow daisies".

Sunday, January 17, 2016

Stamping Saturday: "Safari sunset marble" using The Don Deeva polish and stamping with MoYou London Explorer 23

Introduction

Contains press samples

Good day darlings. Today I have super bright and cheerful marble nails with Safari stamping. For marble decals I used two The Don Deeva polishes from Lost my marbles collection - Pink and Yellow. This polish is sheer neon jelly, so colors really pop if you apply them on top of the white background. After finishing with application of decals I decided that safari stamping would nicely complement these water marble patterns. And it turns out that I never did safari nails before, hard to believe, right? I'm super happy how they look all together, this might be my new favorite water marble design.

Results

Figure 1. "Safari sunset marble"

Wednesday, January 13, 2016

"Neon marble fox" nail art using Fair maiden Rainbow brights collection.

Introduction

Good day darlings. I want to share another water marble. This time it's super special for me, because it's a foxy water marble and fox is my favorite animal. I used neon polishes from Rainbow brights collection by Fair Maiden. This collection was designed for water marble, so it was super easy to use it. I'm very happy with final look, so bright and foxy.

Results

Figure 1.  "Neon marble fox"

Tuesday, July 21, 2015

30 Days of colour: Femme Fatale Gossamer dust swatch

Introduction

Good day darlings, one more swatch for you. This time it's gorgeous thermo shimmer with yellow to orange transition. Those of you familiar with WoF will appreciate that this beauty is called Gossamer dust and the rest can just enjoy this delicate beauty. I love yellow and orange polish and I love thermos, so this one is my ultimate dream polish. When I was wearing Gossamer dust my nails were long and nail tips naturally showed transition to orange. In order to get them completely yellow or more orange I had to use warm/cold water before taking pictures. As with most yellow polishes you will need 3-4 coats to get full opacity, I did 4 layers just to be sure and because I enjoyed putting it on ;) Gossamer dust has very beautiful shimmer and looks great as a base for nail art, which you can see on my previous post. Yellows are not for everyone, but if you like them this polish can easily be a star in your collection. For me, there is no doubt it's my personal favorite yellow, even considering Toxic Buttercup from Crows toes, and it says a lot.

Results


Figure 1.  Gossamer dust swatch.


Saturday, July 18, 2015

Sinful colors Prosecco and reverse stamping nail art "Banana love" for #OMD3 challenge

Introduction

Hello my dear readers, today I have non conventional love nails for #OMD3 challenge. Look at this little cute monkey face, is not he happy? Of course he is, so many bananas around, that's true and pure love. Hmmm, not sure if bananas love him back, though... My base polish is Sinful color Prosecco, which was a gift from my wonderful friend Krise, thank you my dear <3 I used reverse stamping technique and stamped with Moon nails supply polish called Maria - a perfect color for this design. It stamped really well both tiny details and larger areas. Unfortunately, my reverse stamping is not very good yet and bananas do not look neat, but I hope you will forgive me. Enjoy your weekend and eat bananas, it's very good for your hearts :)

Results


Figure 1. Nail art "Banana love"

Sunday, June 28, 2015

30 Days of Colour: Femme Fatale Gossamer dust and reverse stamping nail art with Monn nails Ellen "Tropical delight"

Introduction

And another month is almost over, summer days are going away too fast. For glitter/tropical prompt I did tropical nails using thermal polish Gossamer dust, so that it matches June macro challenge and instead of glitter I used flaky polish the Silence. Also I tried for the first time reverse stamping, instead of making decals. It's a bit tricky, but faster than decals. I picked up stamping image, colored flowers using gorgeous orange Ellen from Moon nail supply and stamped them on not completely dry and a bit sticky layer of flakies. I had to redo couple nails, because my timing was not good, but this technique is definitely worth learning. Thank you Sumeet for telling me about it!!!  Needless to say I'm in love with result, just look at macros, shimmer, yellow to orange thermal change, flakies and stamping, this mani has it all. 

Results


Figure 1. Nail art "Tropical delight".

Saturday, June 6, 2015

30 Days of Colour: Indie polish neon watermarble and Mundo de Unas stamping with MoYou Explorer 23 "African masks"

Introduction


My second June entry for 30 Days of Colour challenge Neon/splatter is a actually a stamping over neon water marble, so no splatter part. Water marble was done using decal technique, you can find detail in the original post. I was not sure which king of stamping to do and used African tribal masks from MoYou Explorer plate. It looks rather unusual, and I can not decide how I feel about this mani. My favorite is ring finger with sad mask, even though this stamping image makes nail look a bit crooked.

Results


Figure 1. Nail art "African masks"

Tuesday, June 2, 2015

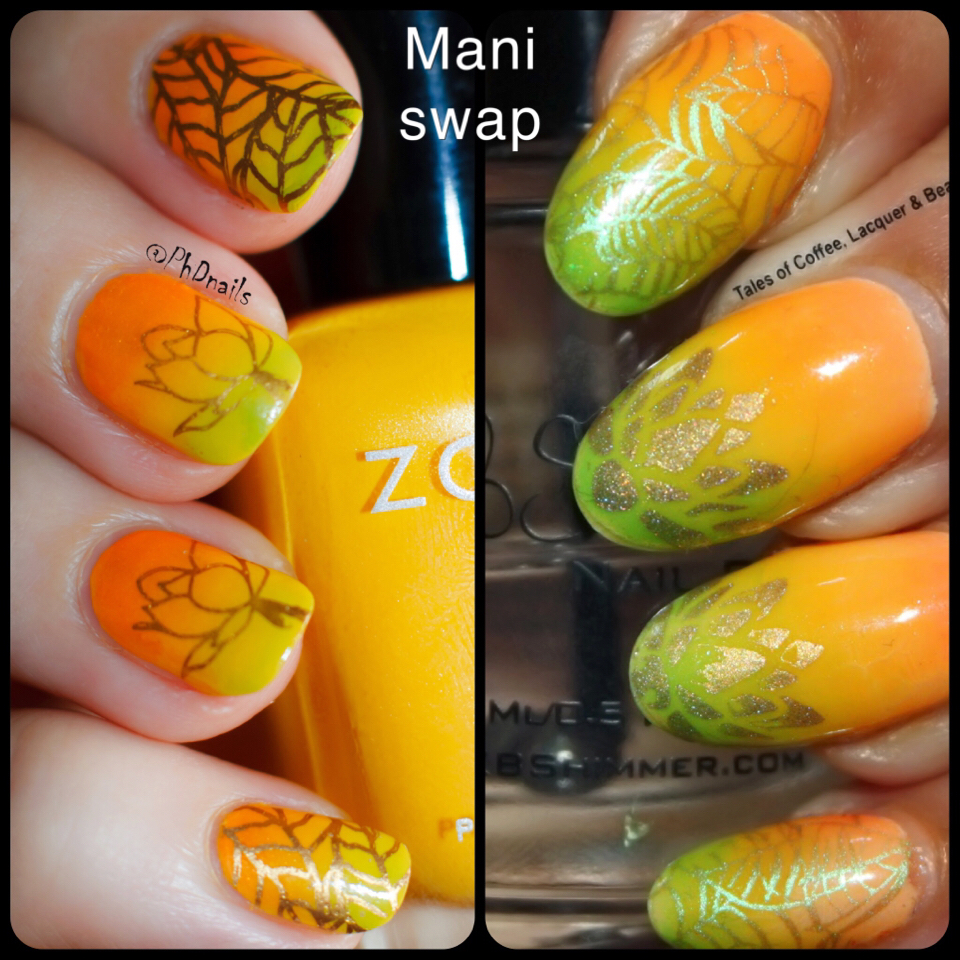
Mani swap: Green yellow and orange gradient with MdU stamping "Golden lotus"

Introduction


Something different today - my very first mani swap with awesome Sumeet from Tales of coffee lacquer and beauty. If you follow her blog (and if not, what are you waiting for?) you know that she does outstanding water marbles and gradients. For this swap we decided to do stamping mani, but I new right away that it will be one of her stampings over gradient, because they are so beautiful. It was hard, we do not have too many similar plates and I love so many of her designs. Finally, when I saw this gorgeous green to orange gradient I could not resist, even though my lotus and leaves are pretty different. But this color combo is divine, it glows on my nails. I love everything about this mani, thank you Summet for this opportunity to swap with you.

Results


Figure 1. Nail art "Golden lotus".

Saturday, May 23, 2015

Water marble decals with neon Indie polish "The brighter - the better"

Introduction

Neon water marbles are one of the hottest trends currently and I was really sad because of my no buy I could not get any new polish, to try it. Not for long though, just until I realized that neon matte collection which I bought during winter could be good for marbling. And my intuition was right, they marbled perfectly (Figure 1 and 2)!!! I used 1 coat of yellow  Don't forget the sunscreen as a background and made water marble decals for all fingers except ring finger. I tried this technique before with Picture polish and loved how clean it's compared to regular water marble. This time I took photo of dried marble to show you (Figure 2, last two pictures), is not it cool?  For my ring finger I used regular dip in method and it also worked fine, but I noticed that marble got more stretched and a bit less vivid, which was not surprising since you push on the marble to get it on your nail. Making water marble decals also allows to achieve perfect positioning and saves a lot of polish. I love this bright final look and how neon green and pink became warmer due to the yellow background.

Results


Figure 1. Nail art "The brighter - the better".

Thursday, May 21, 2015

30 Days of Colour: Stamping inspired by baby clothes "Happy octopus" with Lakodom and Moyou London Sailor 08

Introduction

This nail art was inspired by cute baby clothes of my 8 month old son Andy. I though it's gonna be fairly simple to do, but I was wrong. Main problem was that I decided to make it on my right hand, so I had to align stripes with non-dominant left hand. Another problem was to place decal of small octopus, which I had to enhance using hand drawing on the stamper. As a solution for ring finger I made double decal with stripes and octopus , that too I misplaced first time. After finishing and taking some glossy pictures it was obvious that matte look will be better, that's why I decided to make this look my belated entry for 30 Days of Colour matte/stamping. And finally, base color is Lakodom, and I really admire collages made by Polina, so I decided to show my inspiration for these nails with "Lakodom style" collage.

Results


Figure 1. Nail art "Happy octopus".

Sunday, March 22, 2015

Swatch Indie polish - Don't forget sunscreen

Introduction

Sunny and bright Don't forget sunscreen is the last polish from "Meet me in Mexico" collection by Indie polish. It does not have matte finish as other polishes in this collection, but  it has satin finish which looks really nice. As most yellow polishes it requires three coats to be opaque, but they dry fast. I used this polish for "Honeybee" nail art and was really happy with the results.

Results

Figure 1. Collage with Don't forget sunscreen.

Tuesday, March 10, 2015

Konad back pearl nail art "Honeybee"

Introduction


There was only one polish starting from letter "K" among my untried ones - Konad stamping polish Black pearl. Therefore I used it to create this bee themed nail art. I have to say that this polish stamps very well and yet I hate it. Why? You probably noticed that my index and ring fingers have black background, I had to redo them completely after I applied top coat on my nails stamped with Konad, because it smeared so badly. And I tried two glossy topcoats and one matte, I gave it super long time to dry (6 hours), nothing helped. It was very frustrating as all my stamping work was just ruined. Since black pearl polish was smearing terribly, I left remaining fingers without any topcoat for this pictures. I did mattify black fingers stamped with yellow Mundo de Unas and surprise, surprise no smearing whatsoever. I love my MdU polish and Konad black pearl is going to "better do not use" box.


Results
Figure 1. Nail art "Honeybee".


Sunday, March 8, 2015

China glaze Dashboard dreamer and "Mimosa" nail art for International Women's Day

Introduction


Today is very special, it's International Women's Day, which is celebrated worldwide, in Russia, Eastern Europe, South America, Africa and China. The idea of this holiday started in Soviet times (you can read more in wiki) and it's a mixture of Valentine's and Mother's days. This beautiful day is dedicated to women, so that all of them can feel loved and pampered, therefore I think it should be celebrated in every country :) In Russia, bright yellow mimosa became a symbol of March 8th, as it's sold everywhere only during this holiday. Many russian women are tired of mimosa's and dislike them, but for me they look like miniature suns, fluffy and colorful, perfect to celebrate beginning of spring, femininity and beauty. Happy women's day my dear ladies !!!

Results

 Figure 1. Nail art "Mimosa".

Friday, December 19, 2014

Winter nail art challenge: Christmas carol/song/movie

Introduction:

I did not have time yesterday to write a post, but I made nails and my inspiration was awesome movie The Nightmare before Christmas. It's definitely one of my favorite Tim Burton's creations because it combines Halloween and Christmas and this is really hard to beat. 

Results:


Figure 1. "The Nightmare before Christmas".


Tuesday, September 2, 2014

September Nail Art Challenge: Stamping Month! Day 2: Lace

Introduction:

Doing different stamping everyday is fun, but full change of mani is too demanding. So i decided to cheat little bit and used my right hand with the same Toxic Buttercup background for second day lace stamping ;)

Results:


 Figure 1. All five nails stamped with one lace pattern, but I tried to shift pattern for each finger to make it more interesting.

Monday, September 1, 2014

September Nail Art Challenge: Stamping Month! Day 1: Flowers

Introduction:

This month I decided to participate in the nail art challenge proposed by Tina, which is all about various stamping themes. Also from now on I will start to make real, full size posts in this blog describing in more details my nail art. And just to add personal touch each post will be shaped in the style of scientific paper including following sections: Introduction, Results, Materials and Methods, Discussion and References :) Hope it's not too nerdy... 

 Since it's just the beginning for me, I would really appreciate your comments and suggestions for blog improvement. 

Results:


 Figure 1. All five nails stamped with two different flower patterns. This combination of yellow and purple turned out very nice for my taste, especially considering pink shimmer of background polish: Toxic Buttercup,