Showing posts with label Chez Delaney. Show all posts

Saturday, March 5, 2016

40 great nail art ideas: Pastel neon gradient with animal print stamping "Sping zepard"

Introduction

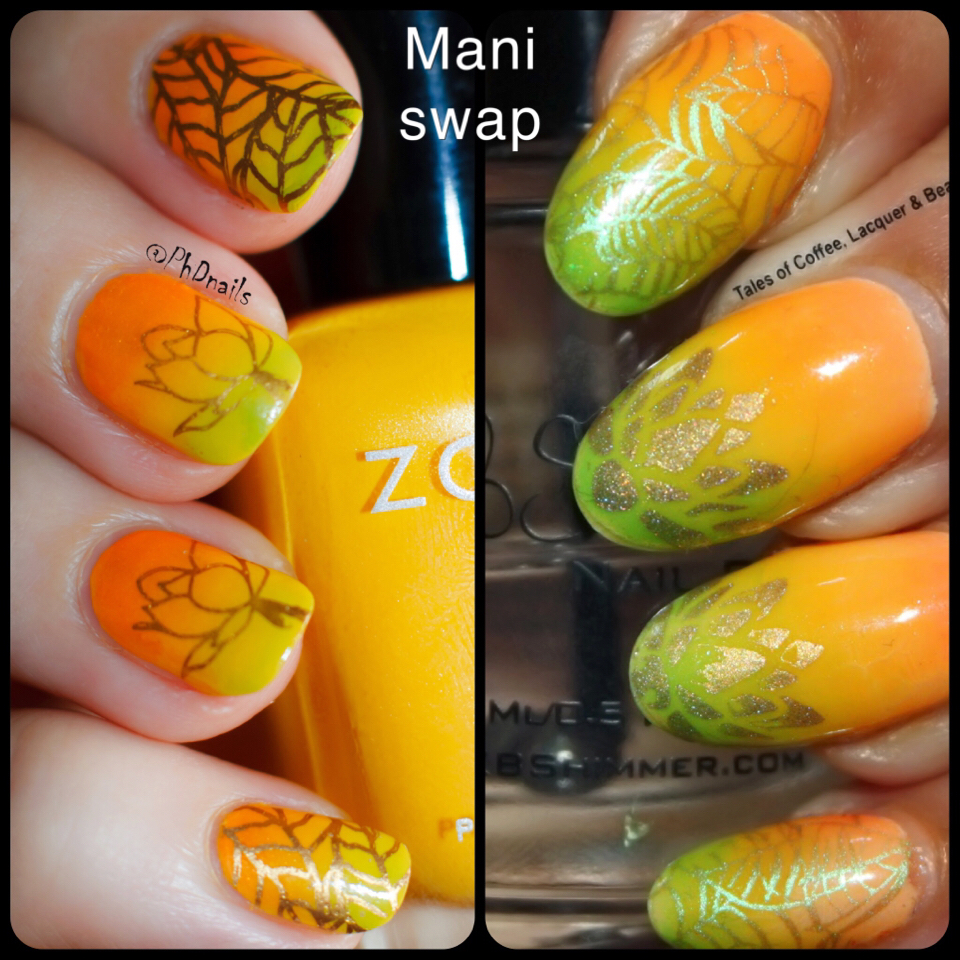
Good day darlings. This week we were doing pastel designs for 40 great nail art ideas challenge and my prompt was "Leopard print". Recently I saw gorgeous many created by Clairestelle8 where she is turning neon polish into pastels and that's exactly what I did here. Basically, you have to add layer of white polish on your sponge after you applied neons (short video tutorial will be on my IG). Also i was inspired my animal print image from MoYou London Explorer 23 which combines both leopard and zebra print. So I decided to recreate it, but with different plates because I wanted more delicate image on my small nails. Given that I had to make it on my Cinderella right hand (two nails are broken on my left hand..) clear stamper from Born pretty store turned out to be very handy. I'm not a huge fan of animal print, but this mani turned out fantastic. Too bad on my pictures you can not see very well delicate holo sparkle from Djinn, but it looks marvelous in real life. Oh yeah, I call this mani "Spring zepard", let me know what do you think about it.

Results


Figure 1. "Sping zepard"

Monday, December 28, 2015

Glitter placement lead lighting with The Don Deeva collection Lost my marbles "Floral glitter lighting"

Introduction


Press samples

Good day darlings. I know you really loved my Christmas glitter placement and I also enjoyed wearing it so much. That's why I decided to make another design with glitter placement. And because it was not time consuming enough, I combined it with individual glitter lead lighting. I call it glitter lighting for short, omg... did I just invent new nail art technique??? And I just had to add some stamping on top, I'm a real stampaholic after all. For lead lighting I used outstanding neon jellies from The Don Deeva collection called Lost my marbles. They also water marble and have shimmer inside, wow. Before I used OPI tints for lead lighting and it was a pain, because as top coats they are quite sticky and if you are not quick enough tend to form tiny filaments, sort of like melted cheese. I hated it. There is no such problem with Lost my marbles, as they glide right on and covered each glitter effortlessly, I was super impressed. It was such a pleasure to lead light with them. Take a look at my video tutorial to learn more about "glitter lighting".

Results


Figure 1. Nail art "Floral glitter lighting"

Friday, July 24, 2015

HPB presents: Crows toes Terminal Engagement with starry night sky stamping nail art "The night he was born"

Introduction

Good day darlings, this post is a combination of three different challenges July HPB blog link up "Starry night sky", 30 Days of Colour Black & White prompt and #OMD3 Star sign prompt. Also, I decided to dedicate it to my baby boy who was born 10 month ago, wow time flies... in September 2014 and his zodiac sign is Virgo. Background polish is Terminal engagement by Crows Toes and I have to say it makes perfect night sky, what a shame I waited so long to wear it, more than 6 month... Stamping was done using off white polish from Moon nails supply called Angel, what a sweet name and perfect for this nail art too. I made Virgo sign (yes it's a Virgo sign, check out last macro ;)) on my thumb using decal with glitter placement, because it would have been impossible to place them with my left hand. I love how this simple mani turned out.

Results


Figure 1. Nail art "The night he was born"


Saturday, July 18, 2015

Sinful colors Prosecco and reverse stamping nail art "Banana love" for #OMD3 challenge

Introduction

Hello my dear readers, today I have non conventional love nails for #OMD3 challenge. Look at this little cute monkey face, is not he happy? Of course he is, so many bananas around, that's true and pure love. Hmmm, not sure if bananas love him back, though... My base polish is Sinful color Prosecco, which was a gift from my wonderful friend Krise, thank you my dear <3 I used reverse stamping technique and stamped with Moon nails supply polish called Maria - a perfect color for this design. It stamped really well both tiny details and larger areas. Unfortunately, my reverse stamping is not very good yet and bananas do not look neat, but I hope you will forgive me. Enjoy your weekend and eat bananas, it's very good for your hearts :)

Results


Figure 1. Nail art "Banana love"

Tuesday, July 14, 2015

Stamping nail art with Picture polish Hercynia and caviar beads "Little red riding hood" for #OMD3

Introduction

Hello my dear readers, today I want to show "Little red riding hood" nail art for Book prompt at OMD3 challenge. It's a combination of stamping, free hand and caviar beads. These beads were lying around forever and finally I had an idea how to use them and add extra touch to this cute nails.  I fixed beads on top of the black polish Domiva, so that no green would show. Free hand elements added here and there make this design look complete.

Results


Figure 1. Nail art "Little red riding hood"

Wednesday, June 3, 2015

30 Days of Colour: nail art with Femme Fatale Mirror, mirror on the wall and peacock Chez Delaney stamping "Silver peacocks"

Introduction


It's a new month and I continue to follow 30 Days of Colour challenge, feel free to join us and use tag #30daysofcolourchallenge. You can find list of prompts for June at the end of my post. For the first day we  supposed to do Silver/negative space mani and I chose to show silver nails with peacock stamping. My base polish is gorgeous silver/holo glitter  Mirror, mirror on the wall, but pictures below are not very color accurate. You can take a look at my swatches to see how it looks indoor and outdoor, in reality it's less blue and more silver. If you look carefully you also will notice that two peacocks have different thickness of lines, this is because I had to use different stampers in order to flip image. It's a first time I notice that stamper affected line thickness. I loved how this mani looked in real life, but my photos are not perfectly focused, I guess due to extreme shine. At the same time macros are really good, so keep scrolling until you see them.

Results


Figure 1. Nail art "Silver peacocks"

Tuesday, June 2, 2015

Mani swap: Green yellow and orange gradient with MdU stamping "Golden lotus"

Introduction


Something different today - my very first mani swap with awesome Sumeet from Tales of coffee lacquer and beauty. If you follow her blog (and if not, what are you waiting for?) you know that she does outstanding water marbles and gradients. For this swap we decided to do stamping mani, but I new right away that it will be one of her stampings over gradient, because they are so beautiful. It was hard, we do not have too many similar plates and I love so many of her designs. Finally, when I saw this gorgeous green to orange gradient I could not resist, even though my lotus and leaves are pretty different. But this color combo is divine, it glows on my nails. I love everything about this mani, thank you Summet for this opportunity to swap with you.

Results


Figure 1. Nail art "Golden lotus".

Tuesday, May 19, 2015

HPB presents: Nail art and tutorial with radial gradient and stamping "Tea roses"

Introduction

Today I'm posting my third nail design with May flowers for HPB and it also counts as stamping entry for 30 day of Colour challenge. This look was inspired by tea-roses which I had for Mother's day and it's my first attempt at radial gradient. I really enjoyed creating this gradient and stamping as it has my favorite colors all together. Even though final look turned out more orange than actual roses, I love it and would not change anything. It was also first time when I used cuticle protector called Crystalline nail veil, which I bought from Color4nails. I was every impressed with this product, it was easy to apply and clean up after gradient and stamping was super easy. It inspired me to create small tutorial on this look (figure 6)., let me know if you are going to try and recreate it.

Results


Figure 1. Nail art "Tea roses".

Saturday, May 9, 2015

Femme fatale Glass coffin and stamping nail art with Chez Delaney "River house"

Introduction

It's awesome when polish itself inspires nail art, as soon as I swatched Glass coffin I knew it would be perfect for gradient landscape. There was already a nice thermal gradient on my nails, but I added extra green shimmer in the sky with Green thumb of doom. I wanted to achieve peaceful pastel look and instead of white polish stamped with cream, while adding pastel pink color to the lotus flowers. Needless to say, I love final result and below you will find many pictures. Note that Glass coffin transitions from blue (warm) to purple (cold) and see how perception of nail art changes at different temperatures. Wonderful day and night effect.

Results


Figure 1. Nail art "River house". 

Thursday, May 7, 2015

30 Days of Сolour: Lilypad lacquer Where oceans meet and stamping nail art "Lizard skin"

Introduction

My third entry for May 30 days of Colour is not a green gradient, but green duchrome Where oceans meet from Lilypad lacquer with Lizard skin stamping. I did this stamping as a part of our  Co-op technical challenge (stamping image placement without decals). Since I was stamping with non dominant left hand and my nails were just long enough for Lizards it was quite challenging to achieve good placement. My trick was to squish nail into my Creative shop stamper, rather than placing stamper on top of the nail and it worked really well. I have to admit that one of the nails I had to re-stamp, because first attempt was unsuccessful, luckily Mundo de Unas polish is easy to remove using sticky tape :) What are your tricks for perfect placement of stamping image?

Results


Figure 1. Nail art "Lizard skin".

Wednesday, May 6, 2015

Picture polish Honey moon and Baby boy stamping nail art

Introduction

This nails art was inspired by my little baby boy and was difficult to finish because of faulty stamping plate. Two images which I really wanted to use (on my thumb and index finger) would not stamp completely, so I had to use several tricks, like making decal, partial stamping and painting missing parts with brush to complete this look. All totally worth it, even though time consuming. Did you have bad stamping plate and how did you use it?

Results

Figure 1. Nail art "Baby boy".