Showing posts with label challenge. Show all posts

Saturday, December 26, 2015

Challenge your nail art: foil stamping nail art "Christmas presents"

Introduction

Good day darlings. Today I have another foil stamping nail design. It's called "Christmas presents" and is inspired by gifts which my little son got from Santa this year. I used two beautiful polishes with names which fit fantastically to this mani: pink shimmery polish Once upon a dream from Fair maiden and super interesting blue polish Up above the world you fly Femme Fatale. For stamping I used multicolor foil, which does not look super interesting on its own, but gives fantastic colorful images with stamping.

Results

Figure 1. Nail art  "Christmas presents"

Friday, December 25, 2015

Challenge your nail art: "Silver & gold Christmas" with Mona Lott from The don Deeva

Introduction

Press sample

Merry Christmas darlings, have a wonderful time with your family and friends. Here is silver and gold Christmas nail design which you might enjoy on this special day. I used wonderful silver glitter from The Don Deeva called Mona Lott on top of the nude peel of base and added some real gold particles using Gold leaf topper from Dance legend. To complete this look I also applied golden Christmas tree and snowflakes from Bundel monster. Using metallic confetti is really challenging for me, but I think this design turned out much better than last year. In fact it was super sparkly, but I completely failed to catch it with my camera. Next time I'm gonna use this glitter on a sunny day and you will see how gorgeous it actually is.

Results


Figure 1. Nail art "Silver & gold Christmas"

Tuesday, December 22, 2015

HPB presents: Glitter placement nail art with Dance legend Mountain snow "Christmas glitters"

Introduction

Good day darlings. Today I have something special, my first real glitter placement nail design inspired by hand made Christmas ornament which I found online. I used 1 coat of Dance legend Mountain snow as background and placed white and pale mint green glitters on top. It was easier and not as time consuming as I thought, guess it's because these glitters are quite large. I love how sparkly and original my nails look, really like mini ornaments, ready for Christmas tree.

Results
Figure 1. Nail art "Christmas glitters"

Tuesday, December 15, 2015

Challenge your nail art: stamping decals nail art with Infinity nails 113 plate "Winter wonderland"

Introduction

Good day darlings. Today I want to share super cute nail design done using stamping decals technique. The base polish is gorgeous thermal from Femme Fatale called Blue within Blue eyes and it changes color from pale blue to intense blurple. For stamping images I used Infinity nails stamping plate and I also used a large number of Mundo de unas and some El Corazon polishes to color my decals. Before taking pictures, I was sure that decals were really good, unfortunately with close ups you can see that they are not that great. Next time I'm gonna do decals with better light and probably I should use some magnification. Anyway, it was really fun to make like coloring a Christmas book from childhood.

Results


Figure 1. Nail art "Winter wonderland"

Saturday, December 12, 2015

Neon candy cane water marble and stamping decal with The Don Deeva polish

Introduction
Press samples

Good day darlings. This post is very special for me, because this week I received my very first polish for review from amazing Danette, creator of the Don Deeva polish. She generously sent me two collections and one custom made polish. I'm already working on proper swatches, but I could not wait and decided to use her polish for nail art right away. I've heard that The Don Deeva polish watermarbles really well and was super excited to try it myself. And oh my, it was much better than my expectations, even glitters watermarble perfectly. Since it was my long time dream to make a water marble design with glitter, I used two The Don Deeva jellies and one glitter for festive candy cane design. It turned out super bright and just a bit too neon for candy cane, but I still love it. Do not forget to check video to see for yourself how easy this polish watermarbles.


Results


Figure 1. Nail art "Neon candy cane"

Thursday, December 10, 2015

Reindeer wrapping paper inspired nail art with foil stamping

Introduction

Good day darlings. Today I have nail design of which I'm really proud. In order to combine two challenges, I wanted to make something inspired by wrapping paper with reindeer. Among all beautiful gift wraps which I found online, one with  simple light brown background and foiled reindeer design really cough my attention. I decided to replicate it using foil stamping technique which last time turned out so great. Moreover this time I had special foil top coat from Picture polish called Revolution. It was recommended by one of my readers, the owner of Pins patterns and polish blog. Thank you, thank you so much  it works so perfectly for foils, does not smear them or interfere with holographic shine. However, since I was using White Konad for stamping and red foil it was way more difficult to get clear image. All the tiny bits where foil did not stick where showing right away. I had to repeat several times until it started to work well. So my recommendation is to use stamping polish similar in color to the foil. Unfortunately non of my red stamping polishes worked well for this technique. I also tried to cover entire nail with foil and this worked very well with Color club Berry and bright as a background. Finally, to finish this look I stamped Christmas tree and snowflakes on top of the foiled nails and covered everything with two coats of Revolution. This top coat helped to preserve foil for several days, needless to say it made me super happy.

Results


Figure 1. Nail art "Reindeer wrapping paper inspired"

Tuesday, December 8, 2015

Red gradient and golden Christmas ornaments nail art with metallic tattoos

Introduction

Good day darlings. Once again I decided to combine two challenges When colors collide, Red and gold prompt and Ornaments for 12 days of Christmas nail art challenge. I started with red gradient including dark red cream Valentine (next to the cuticle), red cream Shock (middle) and red jelly with gold shimmer Vegas (on the tips). This gradient turned out very beautiful and so reach. I tried my best to show it on pictures, but it was even better in real life. To make golden ornaments which would really pop up, I used gold tattoos. It's my second time using tattoos for nail art and I'm absolutely in love with the final result. So bright and festive, I could wear these for entire Holiday season and never get bored.

Results


Figure 1. Nail art "Christmas ornaments".

Monday, December 7, 2015

December macro challenge: Picture polish Never nude swatch

Introduction

Good day darlings. Today we begin our December macro challenge and you will have entire week to post your macros of White/shimmer polish either in our FB group or on Instagram. Please do not forget to use tags #Decmacrochallenge and#macrochallenge, so that we can find each other. My entry for this prompt is combined with another challenge 30 Days of colour. I want to show wonderful off white Picture polish with shimmer and sparse glitters - Never nude. It does look like a sparkling snow in the bottle (take a look at my macros at the end), but unfortunately I was not able to catch the same shimmer on my nails. And even  though application was a bit tricky due to the thick consistency, I still love it a lot.

Results


Figure 1. Never nude swatch.


Saturday, December 5, 2015

Picture polish Vegas swatch and Christmas tree stamping BP 01

Introduction

Good day darlings. I was going through my Christmassy shades of polish and realized , that I never showed you gorgeous red Picture polish called Vegas. It's a bright red jelly with gold flakes perfect for Holiday season. It's quite pigmented and gets opaque in two coats. To highlight beauty of this polish and add even more festivity, I stamped gold Christmas tree from BP1 plate on ring finger and added some gold/holo glitter on top. This will be my entry for Stamping Saturday... well there is a stamping, so it should count, right?

Results


Figure 1. Picture polish Vegas swatch.


Wednesday, December 2, 2015

Challenge your nail art: Sinful colors Pinky glitter and snowflake stamping pond nail art "First snow"

Introduction

Good day darlings. Today I want to show you another pond mani, this time with snowflakes. Surprisingly, it's a pink pond, because I though it would be perfect for representation of delicate first snow. In addition to pink jelly Carol by Julep I used pink holo Pinky glitter from Sinful colors and this combo turned out spectacular. Also while stamping snowflakes I used both white and silver colors which resulted in very interesting final look. You can appreciate detailed beauty of this design from my macro images, where I was able to catch holo sparkle and depth. I created this design for Challenge your nail art, you can find list of all prompts at the end of my post. And it looks like this 12 days Christmas challenge is going to be super fun!!!

Results

Figure 1. Nail art "First snow"

Tuesday, December 1, 2015

December macro challenge with prizes

Introduction

Good day darlings. Today is the first day of December and I want to invite all of you to join our December macro challenge. This time it will be different. We are switching to one prompt a week and since it's a holiday season there will be two small prizes involved. The rules are very relaxed (please read them below) and you can combine this challenge with any number of other challenges. Even if you just started to take macro pictures you are welcome to participate. It's really simple, just find our group on Facebook Macro nails and polish, join it and start posting your macro images. If you prefer Instagram use our tags #DecMacroChallenge, #MacroMonday and #MacroChallenge, so that we can find each other and everyone can appreciate your work.

Saturday, November 28, 2015

Emily de Molly Corsetry and stamping nail art with MM24 "Black feather - red ink"

Introduction

Good day darlings. Here is my last design for November Clairestelle8 challenge and another entry for stamping Saturday. The prompt was feathers and I decided to stamp huge feather across 4 nails. Black feather, red ink - does not it look intriguing? What are these words about - love or murder or maybe both? And of course do not miss holo sparkle of Corsetry (color4nails exclusive EDM polish) on macros.

Results


Figure 1. Nail art "Black feather - red ink"


Thursday, November 26, 2015

Picture polish Autumn and stamping nail design with MM 19 plate "Autumn owls"

Introduction

Good day darlings. Today I want to share nail art for Owls prompt at #clairestellechallenge and for this design I finally used Messy mansion plate, which I had forever and wanted to use so badly. It was really easy to choose background polish for the fall look I used bright orange Picture polish called Autumn. For index and ring fingers, as well as pinky I made stamping decals. And for middle finger I just stamped tree and added colorful leaves using dotting tool. I absolutely adore this cheerful fall design, but unfortunately my macros turned out blurry due to the insufficient light. Hopefully you will forgive me for this. As a bonus at the end there is a link to my video tutorial of water marble turkey nail design. Happy thanks giving everyone!

Results


Figure 1. Nail art "Autumn owls".

Monday, November 23, 2015

When colours collide: Zodiac nail art with vertical gradient using Enchanted polish

Introduction
Good day darlings. Today I want to share my zodiac mani for collaboration project "When colours collide". I did not have any zodiac stamping plates, so I had to do a free hand... To compensate for simple zodiac signs drawing I attempted vertical gradient with lots of holo polishes, well it does not really look like a gradient, boo.... The zodiacs on each finger correspond to my family members. Leo is my mom and me, Taurus - my dad and sister, Pisces my hubby and Virgo is for my baby boy :) Firstly, I created gradient on each nail and topped them with 7 nations army holo glitter. Next, I made decals of each zodiac sign and applied them and finally I added my favorite holo topper Djinn in the bottle. Voila, lots of holo sparkle and so colourful. In addition, I used same polish to create mandala design on my thumb for macro challenge.

Results
Figure 1. Nail art "Family zodiac".

Saturday, November 21, 2015

Picture polish Bette and dotting nail art "Flowers or snow?"

Introduction

Good day darlings. Finally, a non stamping nail design. Delicate dotting nail art for #clairestellechallenge. I used 2 coats of Bette as background on middle and ring fingers and thumb, on top I drew a floral design using tiny brush and medium dotting tool. On index finger and pinky I made diagonal gradient using Bette, White wedding and Chillax. Finally, I added white dots everywhere using acrylic paint and super tiny dotting tool. I hoped that tiny white dots will look like pollen, instead it reminds me of snow, ahahha. Henсe, I'm note sure if it's more floral or snowy ? 

Results


Figure 1. Nail art "Flowers or snow?"

Wednesday, November 18, 2015

Gothic nail art with Zoya Domiva and holographic foil stamping "Gothic Movember"

Introduction

Good day darlings. Today I again combine #clairestelle8challenge and #mcarochallenge. It was not easy to come up with Gothic Movember nail art util I noticed this skull with mustache on BM 413. In order to make this design really interesting I decided for the first time to use foil on top of the stamping and I chose matte black background for better contrast. Stamping was done with White Konad polish and right after stamping image on the nail I pressed holographic foil on top of it. The result was really mesmerizing, and hopefully you can see it on photos. In fact, I'm super happy that I tried foils. However, there is one problem about using them, I tried to apply several different top coats, but they all reduce holographic shine, so all pictures are shown without any top. Unfortunately, without top coat holo foil got scratched away after one day of wear, so I'm not sure yet how to make this beauty last long. And there is a video tutorial at the end of this post.

Results

Figure 1. Nail art "Gothic Movember".

Monday, November 16, 2015

Enchanted polish Afternoon delight and stamping nail art "Coffee delight"

Introduction

Good day darlings, while I was on vacation my huge 33 plates Mo You London order arrived and today I'm gonna show you nail art with one of these plates. Cook Book 04 plate is all about coffee, perfect for macro challenge "Hot beverage" prompt.  In addition, I used triangle vinyls from Emily de molly to make and entry for Clairestelle8 challenge. Base color is an amazing nude holographic Enchanted polish - Afternoon delight and stamping was done using DRK nails Metallic brown. Stamping was easy, but application of vinyls was a bit tricky. These Triangles vinyls are pretty thin and had a tendency to tear if I was not careful enough. On the bright side, I was really happy with polish combination, it looks stunning and makes a wonderful coffee themed pallet. 

Results


Figure 1. Nail art "Coffee delight".

Wednesday, August 12, 2015

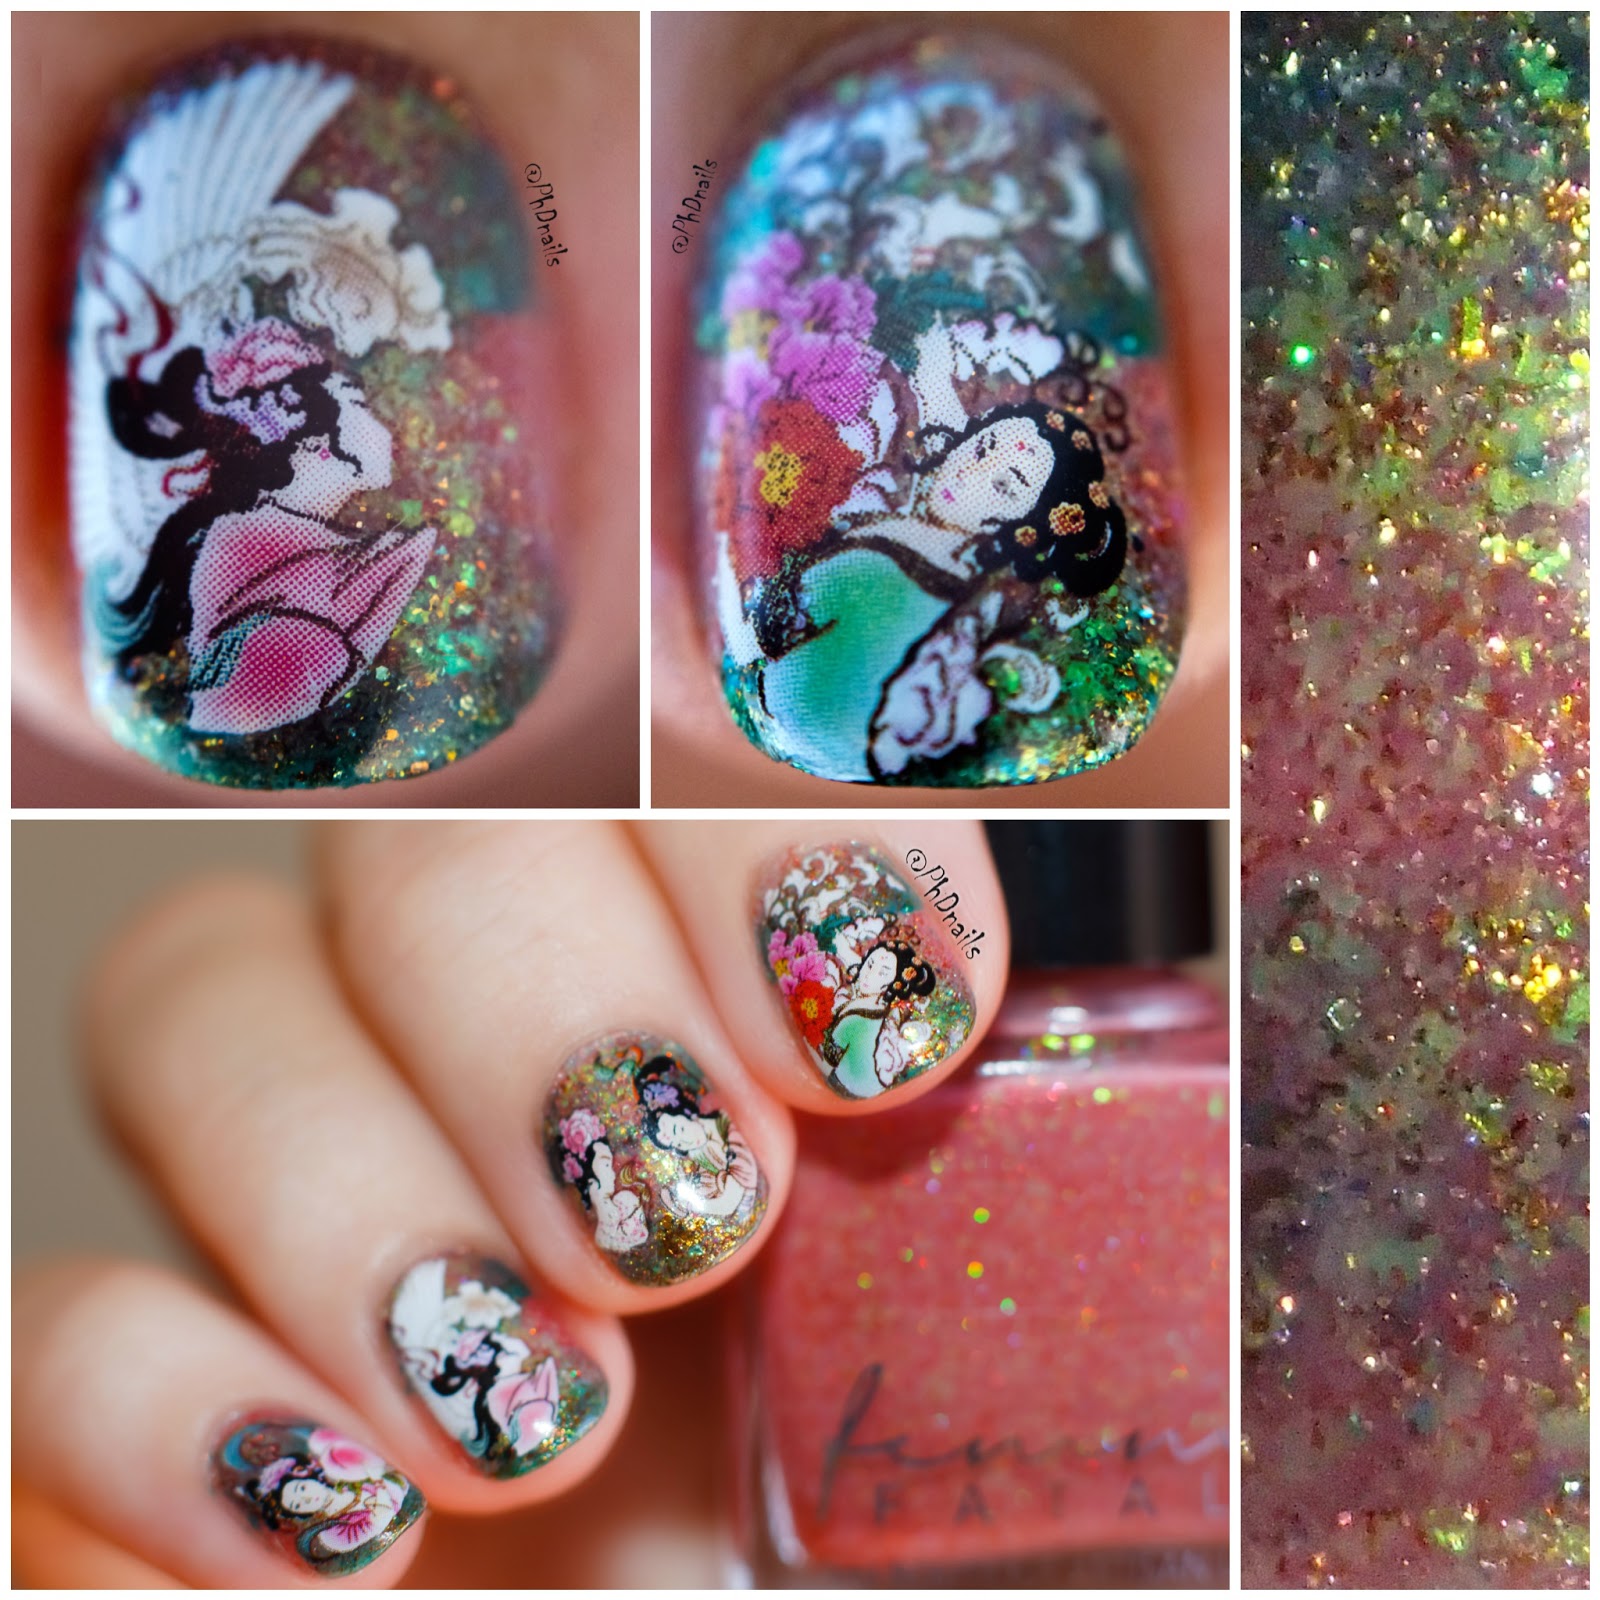
Nail art with traditional Chinese Peach water decals and scaled gradient background "Oriental beauties"

Introduction

Good day darlings, what are you doing if you failed at scaled gradient? Right, cover it up with water decals. That's exactly how this nail art appeared, so it's not a complete failure and I use it as my entry for Russian challenge with water decals. I even like how two gorgeous flakies Heart's desire and Gilded grove complement these decals (check out macros at the end), but making scaled gradient with flakies was not a good idea. These water decals look really nice on the nails and were easy to apply, however they have low resolution, which is really visible on close up macro pictures, and is a bit annoying. Do you use water decals, what are your favorite once?

Results

Figure 1. Nail art "Oriental beauties"


Monday, August 10, 2015

Femme fatale Lantern waste and tribal stamping nail art with glitterplacement "Hunting Aztec"

Introduction

Good day darlings, non traditional take on Aztec nails today. First of all I wanted to combine it with glitter placement for our macro challenge prompt and second I really wanted to use those cute images of man and various animals on HeHe plate. So I decided to add little action to the tribal ornament from Bundle Monster plate. The glitter placement part was the hardest, as I have only really small glitters and making a full nail glitter placement was out of question with my skills. Stamping ornament and placing glitter on top definetly helped though. I'm really happy with final look, except that pastel pink MDU lost its colour after I applied top coat, it did not happen previously, so idk what really happened. Oh, and did I mention base polish Lantern waste? It looks so freaking amazing with all the flakies and shimmer, I simply love it.

Results


Figure 1. Nail art "Hunting Aztec"


Figure 2. More images with bottle.


Figure 3. And without.


Figure 4. Individual nails.


Figure 5. Macro images of stamping with glitter placement.

Materials and Methods

Nail Polish:
  • Femme fatale cosmetics - Lantern waste (3 coats)
  • Mundo de Unas - Pastel pink (!) it changed color after top coat application (stamping)
Stamping plates:
  • HeHe 042 (middle and ring fingers)
  • Bundle monster - BM 604 (index, pinky and thumb)

References

I bought this gorgeous polish at Color4nails and they gonna have restock soon.